Your converter is the humming heart of your RV electrical system. Without a converter, you’re dead in the water.
Unfortunately, most people don’t take the time to ask questions about their RV converter until it ain’t working (or so they think). If that’s you, sorry about your situation! At least you have cell service, right??
Electrical Stuff You Need to Know First
You don’t need to be an electrical engineer to understand how your RV converter works, but you must know the basics!
Reading my article about Battery FAQ is a great place to begin!
Let’s start with your power source, the Tree of (Electrical) Life:
99.9% of RVs and campers accept either 30-amp 120-volt* power or 50-amp 240-volt power.
Not sure about your RV? There’s an easy way to check. Look at your power cord. Do you see three prongs? Then it’s 30A or less. A few micro campers accept only 15A or 20A service, but that’s pretty much limited to teardrops and old pop-up campers.
If you see four prongs, then it’s almost certainly 50A. Larger campers with washers, dryers, or electric ovens will use 50A power. This power combines two legs of 120-volt power to make 240-volt power – but that’s more than you probably care about.
Hopefully, you already know the basic differences between volts, amps, and watts.
- Volts (V) measure electrical potential (sort of like pressure).
- Amps (A) measure electrical current.
- Watts (W) measure electrical power.
The threesome has a simple relationship:
V = W*A
Your converter is a traffic controller for all this power.
It directs the 240V power to your washer and dryer, the 120V power to your air conditioner and microwave, and it converts some of the power to 12V for your lights, stereo, and house batteries. Without a converter, all your power is lost and directionless.
How an RV Converter Works
The terms converter, charger, and power center are sometimes used interchangeably – but they’re all different things!
An RV converter is an electrical device with two jobs:
- It changes alternating current (AC) electricity into direct-current (DC) electricity. As you may remember from high school physics, AC current has a sinusoidal waveform, and DC current has a simple straight waveform.
- Secondly, it transforms voltage from “shore power” 120-volts* to a much lower (and safer) 12-volts.
*You might see this referred to as 110, 115, 120, even 125 VAC power. For all purposes, they’re all the same.
It’s like a magic box that changes the type of electricity.
What goes in: Shore power, also known as grid or household power, which is usually 115-volt RMS single-phase alternating current.
What comes out: 12V direct-current power, also known as battery power.
Why do you want 12V power, you ask? Well, three reasons!
- 12V (nominal) power is what charges your battery.
- Many features on your RV, such as your lights and ceiling fan, only run on 12V power.
- Other features on your camper, such as your furnace, require a little bit of 12V power to operate the control boards.
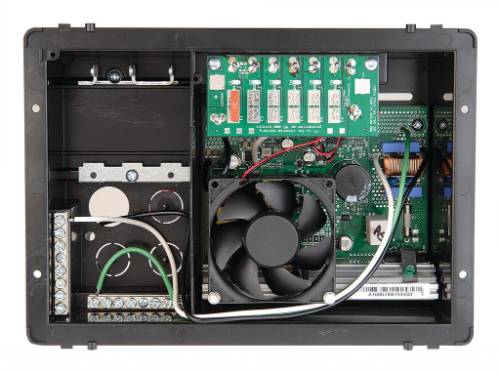
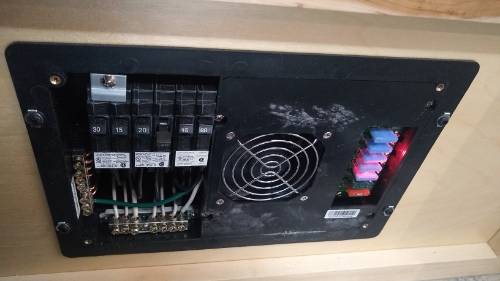
RV Converter Walk-Thru: Progressive Dynamics PD4100 Series
I have an idea. Let’s read through a converter manual together. I’ll highlight some of the important parts I think you should know.
Let’s look at the Progressive Dynamics 4100 Intelli-Power Power Center. The PD4100 series is a common aftermarket upgrade. It’s designed for 30A 115V service.
Here’s the manual: Microsoft Word – 110856 English (progressivedyn.com). Let’s turn the pages.
Pay Attention Where You Mount It
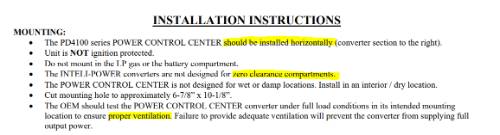
You can’t just mount a converter in any random orientation. If the manual says horizontal, stay horizontal!
And check out that zero-clearance rule.
Some converters bring in cool air from a lower front return and exhaust hot air through an upper front vent. These are often rated for zero-clearance installation. In other words, you can mount them in a sealed cabinet.
However, most converter power centers suck in air from behind and expel it through the front. That means you need a ventilated cabinet (usually with a minimum cubic foot rating).
Don’t ignore this restriction! You’ll burn up your converter in short order.
Use Cable Clamps
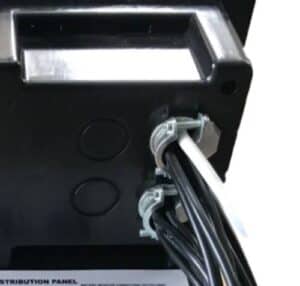
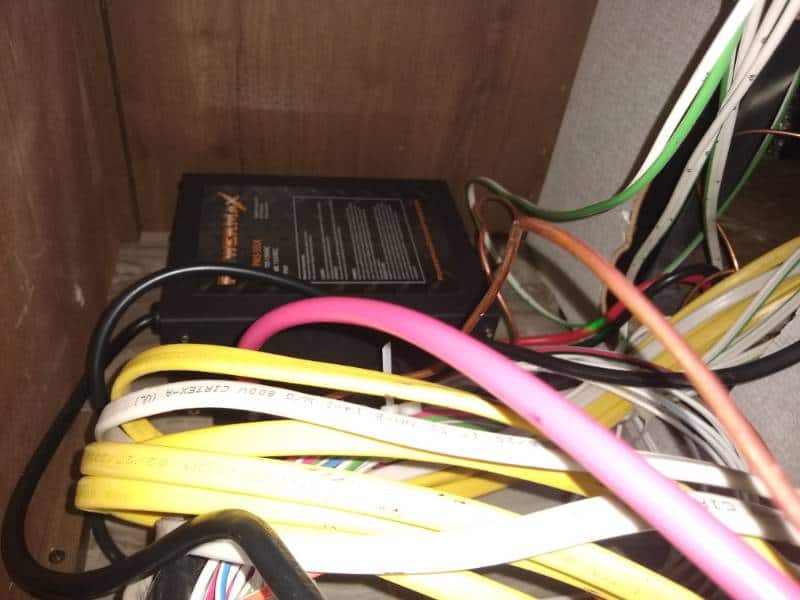
Lots of DIYers forget to include cable clamps when re-wiring a converter, and it irks me.
Those cable clamps act as strain reliefs. They transfer strain from the copper wire itself to the plastic jacketing. That’s extremely important!
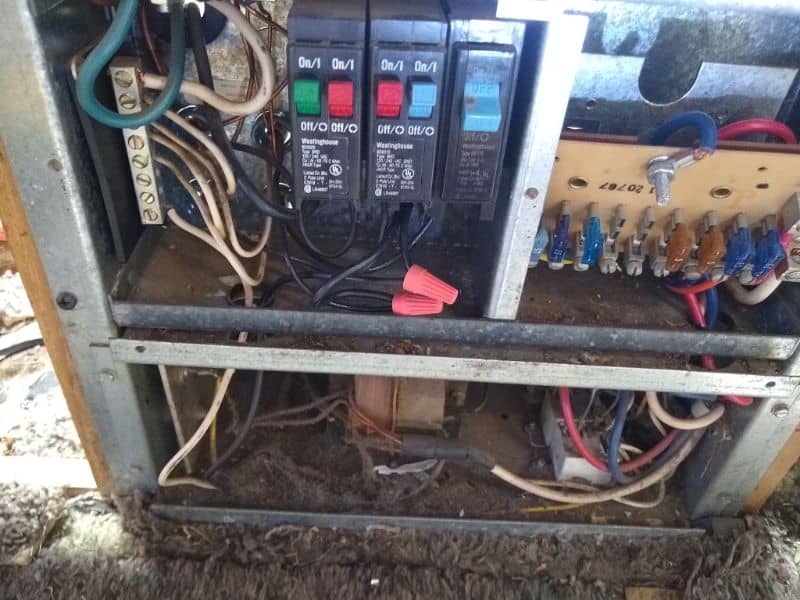
Supply a Negative Ground Bar
Looks like Progressive Dynamics opted not to include an integral low-voltage ground/negative bar for the DC branch circuit returns.
That’s a somewhat common sacrifice among small converters like this. Thankfully, all you need is a bus bar or terminal block.
By the way, if you’re wiring a converter yourself, you’ll probably need ¼-inch female quick-disconnect (also known as push-on) connectors to land your DC accessory circuits.
Where’s The Main Breaker??
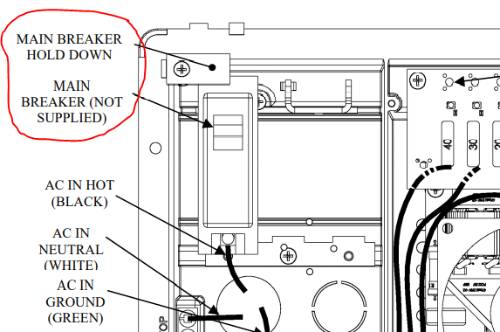
If you come from a residential electrical background, this might be a little confusing.
There’s no separate panel or master breaker space in a typical RV power converter. The main breaker (30A, for this system) occupies a space on the same power bar as all the branch circuits.
Speaking of spaces … this converter advertises space for up to six circuits (five branch + one main). But … there’s only three spaces!
The manufacturer is assuming you’ll use tandem breakers. This is how virtually all RV power centers are marketed, so 1 full-size space = 2 circuits.
Is a Deep-Cycle House Battery Required?
Hmmm … this is interesting. The manufacturer is telling us that we should use a battery in conjunction with the converter, but we don’t have to.
This isn’t true for all converters! Sometimes, you must use a battery! Otherwise, you can get fluctuating, damaging and hazardous output voltages.
The magic phrase you’re looking for is filtered DC output. That usually means the converter works with or without a battery. If without, the converter should output a constant 13.6 volts (the same voltage as a 100% charged 12V battery).
Can It Charge a Lithium Phosphate RV Battery?
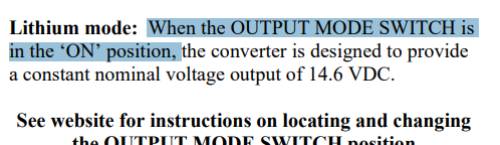
Lithium-phosphate batteries are the bees knees of modern RVs! (Read that out loud, and you’ll appreciate all the rhyming). Unfortunately, conventional 3-stage chargers can’t charge them.
Most RV converters are NOT designed to charge lithium (LiFePO4) batteries.
This one is … sort of capable. It’s not a smart charger. It actually transforms the converter into a single-stage charger. That’s good for lithium, awful for lead-acid batteries – so don’t mix the two!
More advanced lithium-compatible chargers come with multi-stage charging algorithms and real-time feedback. This isn’t one of them. Most of the responsibility is in your hands.
RV Converter Feature FAQs
What’s a “Dumb” RV Converter?
“Dumb” converters are single-stage converters. They hail from the ‘80s and ‘90s. Essentially, they just pump voltage willy-nilly into the battery. It’s up to you, the RV owner, to keep track of your battery state of charge. If you mess up, you’ll overheat the battery.
Even if you do everything right, you’ll still shorten the lifespan of your battery. Lead-acid batteries just aren’t designed to be charged at a constant high voltage.
Almost no one makes single-stage converters are more (thank goodness!). If you’re still depending on a “dumb” charger, you need to upgrade to a multistage alternative right away!
- You’ll significantly improve the lifespan of your battery, sometimes 2x or 3x as long!
- You’ll shorten the charge time. 3-stage chargers can charge a battery to 80-90% state-of-charge in just a few hours.
- You can leave your camper plugged in while in storage. The converter will automatically sense self-discharge from the battery and will restore the lost capacity. This prevents sulfation in a stored battery. Less sulfation = more juice, longer life!
What Is Short-Circuit Protection?
A short circuit is simply when the negative and positive wires in a circuit contact each other. Without normal resistance, an enormous amount of energy flows in a very short time, turning wires red hot, melting insulation, and causing battery explosions.
None of which is good. That’s why every circuit must have some sort of protection: either circuit breaker or fuse.
More advanced converters offer short-circuit protection, which can turn off the converter – without blowing a fuse – if it senses a short-circuit or overload condition. It will reset itself when it detects a return to normal.
This feature helps keep your converter safe. It also saves you the hassle of replacing a blown fuse in the event of a short circuit.
What Is Reverse Polarity Protection?
If you criss-cross the wires to your battery – accidentally attach the positive wire to the negative terminal and vice versa – a fuse will blow. Nothing else gets hurt. You hunt around for a fuse – normally 40A – replace the blown one, and carry on.
What Is Over-Temp Protection?
Electronics don’t like to get hot. Most converters include a thermistor that measures the internal temperature and shuts off the converter if it gets too hot.
If your converter shuts off, verify the fan is working. Make sure the air vents aren’t blocked.
If everything looks good, just wait. The converter will reset itself.
Why Is My Converter Fan Turning Off and On?
The little 12V box fans in your converter turn off and on based on temperature and/or current draw. If it’s hot, they turn on.
- If it’s a hot day or you’re running lots of loads, like turning on all the kitchen lights or running the ceiling fan, you should expect the fan to be running.
- If it’s night-time, with very few lights turned on, the fan should turn off.
You might also see this advertised as a “thermostatically controlled fan.”
Why Would I Buy a Deckmount Converter?
A common upgrade for full-time RVers is a dedicated deckmount converter, like the Iota DLS-55-IQ4 converter.
Simply put, deckmount converters tend to be more heavy-duty, higher-quality than integral converters inside a power center. There’s no law mandating this to be so, of course. That’s just how things are.
Now, what do I mean by “higher-quality”?
- Designed to operate at lower and/or higher operating temperatures
- Withstand low/high transient AC line voltages (under 105, above 125 volts AC RMS)
- Withstand low/high AC input frequency range (e.g., 47-63 Hz)
- Clean, steady, filtered DC output
- Higher output efficiency (80-85% +)
- Bigger form factor, heavy-duty construction, longer lifespan
If you’re running sensitive 12V electronics, or you travel full-time in your rig, you should consider a deckmount converter.
What’s the Difference Between an RV Converter and a Battery Charger?
You use converters all the time! Every time you plug in your laptop, you use a converter. That’s the big, black brick in the middle of your cord.
Now, a charger is like a super-smart converter. A charger can output power to a battery based on a microprocessor-controlled algorithm.
All modern converter/chargers are multi-stage. They monitor battery voltage as the battery is being charged, and they’ll vary their output to prevent under- or overcharging.
Now, as you might imagine, wiring all this together takes quite a bit of time. That’s where a power center comes in. A power center just makes the wiring easier!
A power center is like the hub of a wheel. Everything goes back to it: Your main power supply, all AC branch circuits (panel board), all DC branch circuits, the battery leads, the chassis ground, etc. It’s a convenient interface to connect all the sub-systems.
General RV Converter FAQs
What Are the Best Converter Brands?
Here are several converter manufacturers:
- WFCO
- Progressive Dynamics
- Iota
- Parallax
- PowerMax
WFCO is the OEM supplier of choice. They own most of the OEM market. Unfortunately, they also lack some of the more advanced features of the competition.
Progressive Dynamics is a popular aftermarket upgrade. You’ll see them on several OEM models as well.
Most of the rest target the aftermarket. Iota, I know, enjoys a stellar reputation for durability. PowerMax prides itself on extremely accurate test data and quality control processes.
What Size Converter Do I Need?
Converters are commonly rated in maximum output amperage: 35, 45, 55, and 75 being the most popular sizes.
If a converter is rated for, say, 55A, that’s the maximum amount of output current at one time. If there are no other 12-volt systems operating, that’s also the maximum charge rate for the 12V house batteries.
As a rule of thumb, your converter output amperage should be at least 1/3 of your battery amp-hour capacity. In other words, if you have a 100-Ah battery, your converter should be rated for at least 100/3 = 33 amps.
But you shouldn’t replace your factory converter with a larger model without authorization! The higher amperage could cause wiring to overheat.
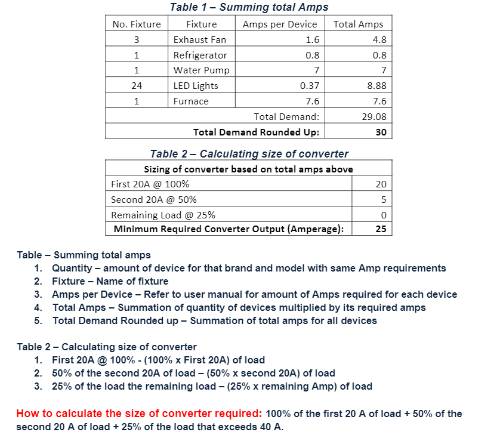
But there’s an even better way to figure it out. Our northern neighbors in Canada have an RV regulation called CSA Z240. They have an excellent method for calculating the minimum size of a converter based on loads, similar to our NFPA 1192. Check out an example in the image below.
Is There a Difference Between a 3-Stage and 4-Stage Charger?
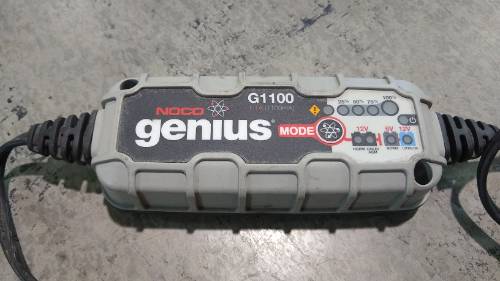
In the quest for sales, manufacturers have introduced 4-stage, 5-stage, and even 9-stage! Battery chargers (here’s glaring at you, NOCO).
As you may remember from my Ultimate Guide on batteries, lead-acid batteries should be charged in three basic steps:
- Bulk: Rapidly charges the battery at high voltage up to ~80% state of charge.
- Absorption: Decreases amperage to bring the battery to 100% state of charge without overheating.
- Float: Tops off the battery and trickle-charges at 13.2-13.4 volts to prevent sulfation.
There are cheap 2-stage chargers that eliminate the absorption stage. You should stay away from these. All three stages are necessary!
I don’t know of any RV battery charger that really has a whole other “stage.” Mostly, that just sounds like sales talk. Some battery chargers do offer advanced recovery/desulfation modes for truly “dead” batteries, but that’s more a mode than a stage. It doesn’t apply to regular charging cycles.
- The Boondocker series of converters advertise a 4th stage, but it’s just a setting for manual voltage control, which 99% of the time would do more harm than good!
- Some chargers (e.g. NOCO) break down the bulk stage into a gentle soft-start phase with a quick ramp up, but does that count as a whole other stage?? Hmmm …
- So don’t worry if your charger “only” has 3 stages and your neighbor’s has 7. Chances are, they both charge your battery about the same.
If you want to know more about 3-stage charging, here’s a good article I found on BatteryStuff.
Do You Bond the Neutral and Ground Wires at the RV Breaker Box?
No, you don’t bond the neutral and ground legs of a circuit in an RV power center. This confusion normally comes from a comparison with a residential main service entrance, where the neutral IS bonded to the ground.
There are many reasons why and where neutrals should NOT be bonded to grounds in auxiliary panels. We’re not going to get into them. Just take my word for it: Don’t connect the two! That’s the responsibility of the campground electrical system, not the RV.
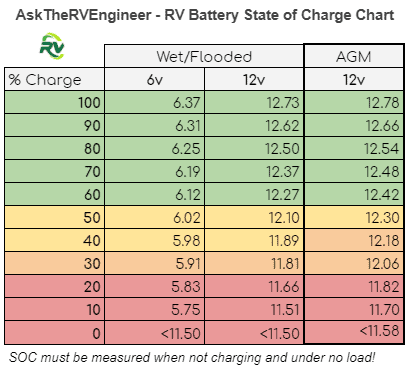
Is Anything Special Required for 6V Batteries?
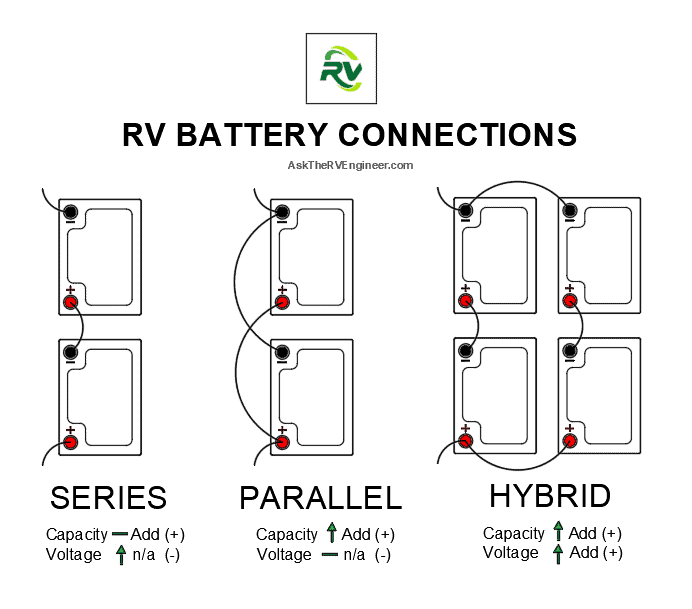
So long as your 6V batteries are wired in series, then no. The positive lead should be connected to the positive terminal of one battery, and the negative lead should be connected to the negative terminal of the battery at the opposite end of the battery bank.
Similar answer if you’re running two or more 12V batteries. So long as they’re wired in parallel, any converter will work. Just make sure your converter is big enough to charge the size of your battery bank!
Leave a Reply