Can I start out with an apology?
The effort required to maintain your RV exterior is unacceptable for modern product design.
Ford doesn’t tell you to reseal your windshield every 90 days. GAF doesn’t insist you have to inspect your shingles every 6 months and replace them every 5 years regardless. Forest River would does.
As an RV owner, you are expected (per the terms of most warranties) to inspect your RV exterior cap sealants before every trip and/or every 90 days. Regardless of their condition, most manufacturers will tell you that all cap sealants should be removed and replaced every year.
Not to mention that the underlying butyl gaskets on many doors, windows and wall penetrations can oxidize and dry out, requiring full replacement and re-installs every 5-10 years.
Or that the only thing guarding your underbelly from a potential rodent infestation is some Great Stuff expanding yellow foam. (Although, to be frank, mice have been known to chew right through the stuff).
Unfortunately, this is the state of the mainstream RV industry. If you’re buying a stick n’ tin or laminated RV, you’re stuck with it.
Now, I do have a few tips for getting off this hamster wheel – or at least slowing it down. Because no one purchased an RV to become a weekend mechanic.
Sealing the Outside of Your RV
This article is about a little of this, a little of that.
If you maintain the outside of your RV, this article will help you understand a bit more about common caulks and sealants, roof seams, corner tape, self-leveling caulk, and other common exterior maintenance items.
Maintaining your exterior isn’t exactly fun. If you have a 15-year-old child, I recommend assigning them the chore. Builds character.
But if you’re stuck doing it yourself, then understanding how and why your RV works the way it does will help preserve your investment.
How Many RV Sealants Are There??
What you should know upfront is that there is a staggering, frightening, befuddling variety of caulks and sealants.
Big brand names include Dicor, Sika, Tremco, Geocel, Gorilla, EternaBond, 3M, DAP, GE, Heng’s, and Alpha Systems. But that’s just the tip of the iceberg.
What you see on retail shelves or Amazon.com is just a tiny fraction of what’s available to OEMs.
Caulks and sealants have an incredible number of properties: adhesion, skin time, cure time, flexibility, application temperature, mildew resistance, substrate compatibility, chemical cleanup, mechanical cleanup, toolability, shrink rate, color, paintability – not to mention any SDS concerns relevant to a manufacturer!
If you’ve done some research previously, you probably know that sealants are made with different chemical bases such as the following:
- Silicone*
- Polyurethane
- Silane Terminated Polymer
- Latex/Acrylic
Be aware that there are several thousand sealants underneath each of these categories. And they are NOT created equal!
Just because SomeDude77 on an internet forum used a “silicone” sealant and it did/didn’t work doesn’t mean you’ll have the same experience.
Honestly, you probably don’t need to know the difference between “silicone” and “siliconized,” or when you’d prefer an tripolymer caulk over a urethane hybrid.
In fact, your manufacturer should have done most of the selection work for you. In your Owner’s Manual, you should have a chart or diagram of the factory’s recommended caulks and sealants and where they should go.
Should I Use Silicone Caulk for an RV?
*I do want to take a moment and point a finger at silicone. You’ll often hear something like “Never use silicone on an RV!”
Is this true?
For you, yes. Silicone caulks available at retail stores typically don’t adhere well to dirty or oily substrates. Worst of all, scraping off silicone doesn’t remove all the residue – and new silicone won’t stick to old silicone! As more than one RV owner has discovered, it can take many hours to properly prepare an RV for a new silicone cap sealant.
Now, to be fair, this isn’t true for all silicone products. Some silicone-based or siliconized products have exceptional adhesion – but unless you shop at a specialty roofing store, you won’t get your hands on any of these. Silicone is best used as a glazing material rather than a waterproofing sealant.
The 5 Categories of RV Caulks and Sealants
Now, before I pull out the microscope and examine each section of an RV exterior, let’s start with the basics.
Virtually all sealing on an RV uses one of five types of caulk or sealant:
- Self-leveling
- Non-self-leveling (aka non-sag)
- Butyl tape
- Flashing tape
- Expanding foam
Again, there is tremendous variety within these categories (especially #1 and #2). But almost anything used to waterproof the exterior of an RV can be tucked under one of these blankets (except for foam gaskets, which aren’t liquid, obviously).
So when things start to sound complicated, take a deep breath, and just remember that you only need to pull from one of five buckets. Not too hard, right?
Here’s a video from RV Repair Club that discusses basic RV sealants:
Popular RV Sealants
If you’re shopping for an aftermarket caulk, tape or sealant, here are some common options. I’m not recommending these, just showing some brand names:
Self-leveling
- Dicor 501
- Alpha Systems 1021
- Through the Roof!
- SikaFlex Self-Leveling
- XTRM Universal Self-Leveling Sealant
Non-Sag
- Geocel ProFlex
- Dicor 551
- Sashco Lexel
- Big Stretch
- SikaSil N Plus
- OSI Quad
Butyl Tape
- Dicor
- Heng’s
- Alpha Systems
Flashing Tape
- EternaBond RoofSeal
- Dicor Seal-Tite
- Cofair Quick Roof Extreme
Expanding foam
- Great Stuff
- Red Devil
Adhesive Sealants
- 3M 4200 FC
- SikaFlex 221
Caulk Application Tips
Here are some helpful tips for applying beads of caulk to your RV.
Fair warning: In my experience, some people are born with steady hands, and some aren’t. Some people can lay a smooth bead without tooling, and some spend hours trying to make something that looks half as good. You know who you are.
- Skin oil is your enemy. Once you’ve cleaned the substrate, don’t touch it!
- Snip the tube nozzle at a slight angle (25-45 degrees).
- Hold the caulk gun at a 30-45 degree angle from the joint.
- Try to push, and not pull, the bead (although like lefties, some people prefer to push).
- Smooth the bead with a caulk tooling spatula. You don’t want any air bubbles or gaps.
- Some caulks cannot be tooled; some can be tooled using your finger and soapy water as a lubricant.
- Use painter’s tape to prevent caulk from squishing out too far.
- Most windows only require a cap sealant on the top and front seam. It’s not necessary to apply a cap sealant around the entire window perimeter.
- Don’t spend too long in one area. Lay the bead, smooth it over, and move on. If you’ve ruined the job, wait until the caulk dries, scrape it off and reapply. Don’t try to fix your mistakes while the caulk is still wet.
Now that we’ve looked at caulks and sealants, let’s look at their two main areas of application: the walls and the roof.
Application Area: Walls
Sidewalls

What you should understand is that almost every seal on the sidewall of your RV is a combination of the following:
- A gasket
- A cap sealant
The gasket is usually either compressible foam or ductile butyl tape. It prevents water from intruding around a feature. It is the primary sealant, and most of the time, you can’t see it. It’s squished between a flange or lip or some sort and the sidewall exterior.
A cap sealant is usually a caulk applied and tooled around the mounting feature of a part. It is a secondary sealant, a kind of backup.
Why Are RV Sidewalls Not Made Like a House?
Now, let’s pause here. Why do RVs use these sealants? Why do you not see these sealants used on a house or a car?
For one thing, most automobiles are created with double-seal designs. Consider your gas cap. It sits behind a little door, right? The door keeps out 95% of all water. Any water that gets past the door has lost all its wind-driven pressure. Now that water has to get past a screw-in gas cap, which sits above a ramped base with a water drainage ring. Not gonna happen.
Meanwhile, houses take advantage of the shingling principle. Your roofing, eaves and rakes, siding, windows and foundation flashing are cleverly designed to channel water away from the bones of the house. And by and large, it works quite well! Sealing comes secondary; shingling (aka overlapping) comes first.
Most RVs don’t leverage either of these engineering principles. There’s no shingling preventing water from running over your window frame; there’s no double-wall design rerouting any water that sneaks around. If the window seal fails, you get water in your camper. End of story.
So, back to the sidewalls.
You don’t want to have to remove all the windows and features and reinstall them with a new butyl tape gasket (believe me). So instead, focus on maintaining your cap sealants. Cracked or peeling cap sealants should be immediately removed and reapplied.
The substrate should be thoroughly cleaned before a new application. If you’re lucky, you can get away with scrubbing and a simple solvent like mineral spirits, acetone or isopropyl alcohol. However, some sealants leave difficult residues that cannot be removed without mechanically sanding or heavy-duty evaporative solvents like MEK (not recommended!).
If you maintain your sidewall cap sealants, you’ll avoid the need to reinstall your windows with butyl tape for a long, long time.
What If I Need to Reinstall a Window?
If you do reinstall a window, use a thick butyl tape (1/8″ thick), and compress it to 15-40% of its thickness. Don’t overcompress, or the mastic tape will continue to spread for several hours (or days) after installation.
Full instructions for how to re-install a window are beyond the scope of this article. In this situation, a video is worth a million words. Check out this excellent video from RVGeeks:
Front Wall & Back Wall
The two end walls deserve special consideration in an RV. Both are subject to some funky aerodynamics and fluid pressures not seen on the sidewalls.
RV Front Wall
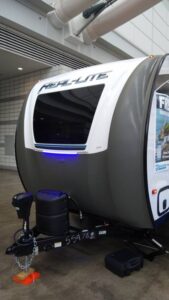
Front walls are infamous for water leaks.
In fact, this is why so many RVs are now built with molded fiberglass front caps. Manufacturers got tired of dealing with warranty claims!
Wind-driven rain when driving at 65 mph has enormous power. It has the near-mystical ability to leak into even the tiniest crack or pinhole.
For this reason, most manufacturers avoid placing slide-outs or windows on the front walls of travel trailers or fifth wheels.
RV Rear Wall
In general, rear walls are constantly under vacuum when in transit.
When the bulk of an RV displaces the air, it creates a swirling vacuum vortex directly behind the camper.
This is why rear-facing windows are notorious for allowing dust and road grime into the camper. Dust is literally being sucked into the camper!
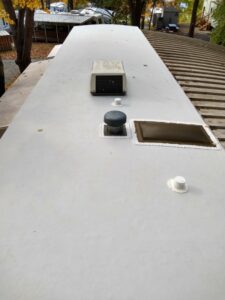
Application Area: Roof
Your roof has a hard job. Come rain or shine, Arizona sunlight or Michigan snow, bird poop or 70-mph winds, your roof must do its job day in, day out, with zero complaints.
What makes for a high-quality roofing material?
- UV resistance (no chalking, no fading).
- Remains flexible throughout its lifetime (no migrating phthalate plasticizers).
- Highly reflective, keeping the RV cooler in warm weather.
- Retains its high performance even in severe cold or hot weather conditions.
- Waterproof, even with ponding water and wind-driven water.
- Not affected by environmental contaminants like gasoline, motor oil, road salts, bird poop, acid rain, etc.
- Resistant to abrasion, scratches, punctures, and dents.
- Repairable and replaceable.
Lightweight, but rugged.
Unfortunately, no material excels in every instance.
Aluminum is extremely tough, but painted finishes are affected by environmental contaminants, and aluminum isn’t easily repairable. Modern TPO formulations are highly reflective and retain their elasticity, but may require regular resealing at any welded seams.
You’ll find one of four types of roofs on your RV.
Types of RV Roofing
1. Membrane Roofing
Membrane single-ply sheet roofing (aka, rubber roofing) has been the mainstay of the RV industry for decades. Chemical compositions have been tweaked, but they all work the same:
Plastic rubber sheeting, pulled off a giant roll, is loose-laid or glued atop the roof OSB or plywood sheathing. Holes are cut in the membrane for pipe penetrations, roof fans, air conditioner holes, etc.
Common types of membrane roofs include:
- EPDM
- TPO
- PVC
Most membrane RV roofs are EPDM, although TPO and PVC have made inroads in recent years. Different chemical compositions and manufacturers will claim one chalks less, one reflects more heat, one is more tear-resistant, etc.
Some membranes, like Dicor’s BriteTEK, have a fleece or woven backing for enhanced adhesion to the underlayment roof decking.
BONUS: Seamed or Seamless RV Roof?
A seamless product is preferable because of less risk of seam separation and water intrusion. Where seams exist, quality varies greatly.
Some plastics, like TPO, can be heat-welded. So long as it’s performed properly, this fuses the two pieces into one sheet.
Other plastics, like EPDM, are normally chemically welded, where a chemical agent essentially melts the two pieces into one. EPDM, generally, cannot be safely heat-welded.
Some installers may attempt to mechanically join single-ply roofing membranes using a combination of lap joints, sealing caulk, staples or screws, etc.
No seal is as good as 100% seamless sheeting. And any type of seal, whether heat, chemical or mechanical, requires skilled labor. Which means I wouldn’t trust them without inspection.
2. Coil Aluminum
A few vintage or specialty trailers will use thin sheet metal, either bare (mill finish), anodized (acid bathed) or painted (usually Kynar) as roofing.
Aluminum is usually NOT glued to the sheathing underlayment. Instead, it is loose-laid (also known as floating) and then mechanically secured around the edge and cut-outs.
Seams in coil aluminum are normally mechanically joined through riveting, clinching or some other method, since welding thin-gauge aluminum requires a great deal of operator skill.
3. Gel-Coated Fiberglass
A few specialty trailers, such as mega-sized teardrops, will use gel-coated aluminum seamless sheet for the roof. This is the same or similar quality fiberglass to what’s used on your laminated sidewalls.
Gel-coated fiberglass roofs are almost always seamless.
4. Molded Fiberglass
Ah, the wonderful molded shell! You have no separate roof! Your one-piece or two-piece molded fiberglass camper shell has a strong, waterproof fiberglass shell all the way around.
To recap, these are the four common types of RV roofs!
- Rubber roofing
- Aluminum coil
- Gel-coated fiberglass sheeting
- Molded fiberglass
Maintaining Roof Seals
Now, let’s talk about maintenance.
Self-Leveling Sealant
Where this conversation starts is with self-leveling sealant.
Self-leveling sealant is a flowable, goopy plastic coating. It doesn’t hold a shape. Instead, it will form a thick, gloppy puddle.
To be honest, “self-leveling” is a bit optimistic. The final puddle usually isn’t actually flat. It looks pretty ugly. But the sealant shouldn’t hold a sharp peak or have empty islands.
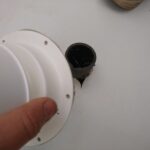
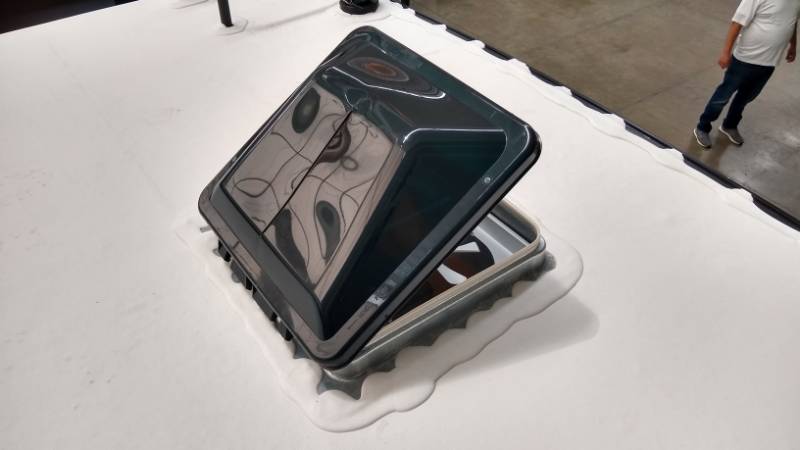
Self-leveling roof sealant is used around your roof penetrations:
- Ventilators
- Ceiling fans
- Skylights
- Exposed screw heads
- Membrane roof edges
- Mechanical seams
Applying this stuff is pretty easy. Just pour and go.
Non-Sag Sealant
If your RV uses aluminum trim moulding around the roof edge corners, you may need to apply non-sag caulk along the seam.
Generally, this is for backup only. The trim moulding should have a gasket underneath to seal any seams or screw holes. Still, a cap sealant prevents rainwater from getting underneath the trim rail and leaking into anything else.
You apply this sealant using the same techniques as a window.
P.S. Advantages of Roof-Edge Corner Tape
I’ll end this article with a bit of advice: If you’re re-roofing, consider applying roof-edge corner tape to your entire RV. It’s a lot of work, but it’s worth it.
Rather than relying on a butyl tape gasket or caulk cap sealant, why not physically tape the seam between the roof and the wall? DIYers commonly use EternaBond RoofSeal, EternaBond WebSeal, or Dicor Seal-Tite to tape the corners. These tapes will work with all common RV exterior materials, such as EPDM, corrugated aluminum, or gel-coated fiberglass.
Leave a Reply