RV salespeople luuuuuuv solar-ready or solar-prep packages. They’re easy talking points – and oh look, it comes with a sticker! Pretty . . .
Unfortunately, they may not mean much else. Solar-ready RV (SRRV) packages come in all shapes and sizes! As a rough rule:
- If your RV has a sidewall port, it’s probably designed for a portable solar suitcase with an integrated charge controller
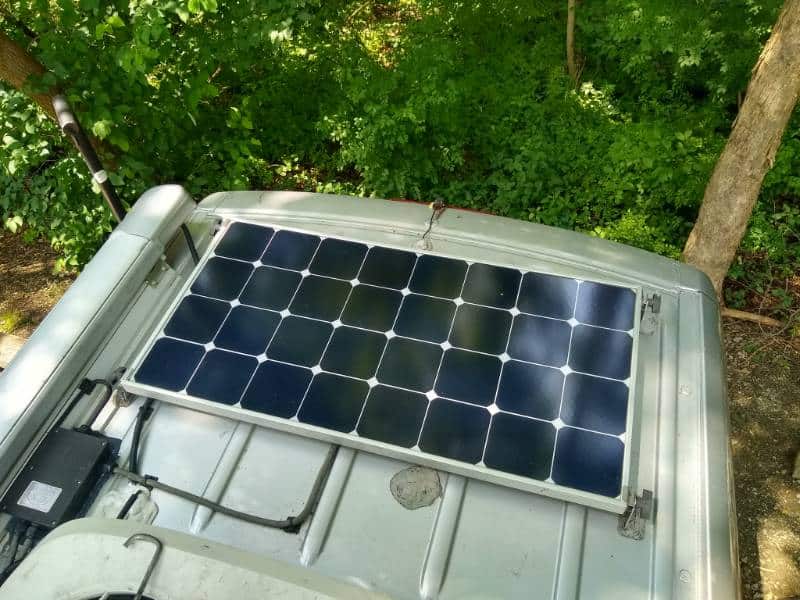
- If your RV has a roof port, it’s probably designed for permanent solar panel installation
What’s (Actually) Included in a Solar-Prep Package?
Wondering what a Solar-Ready RV (SRRV) package really means?
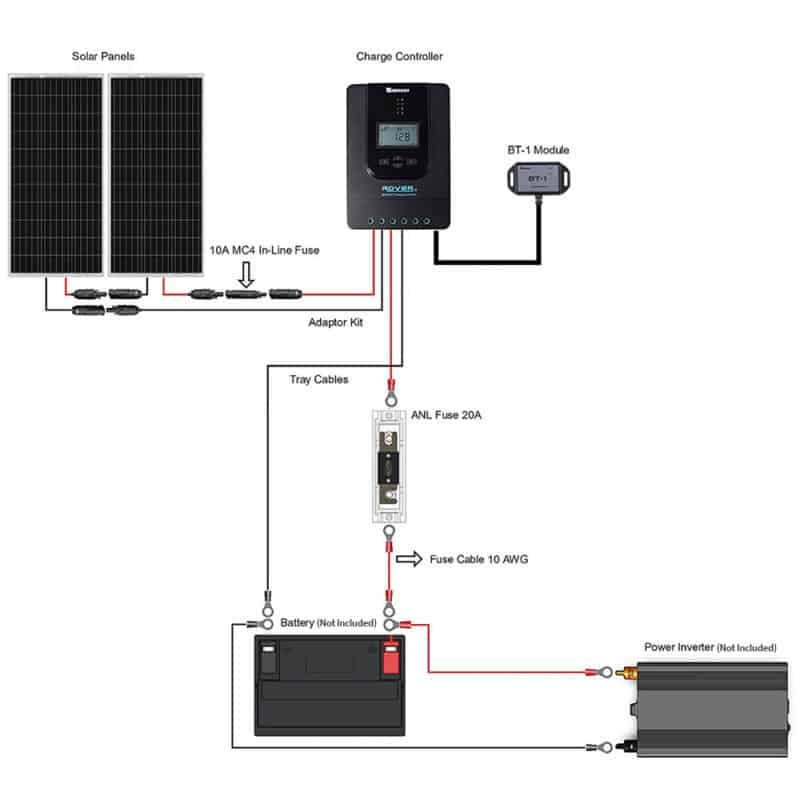
A full RV solar power system has four ingredients:
- Solar panel[s]
- A solar charge controller
- An electric battery
- Wire, connectors and fuses
Your Solar-Prep package will probably look like one of these two options:
Option 1: Cheap n’ Easy
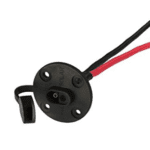
Nine times out of 10, a solar-prep package is nothing more than No. 4 on that list. It’s a plug with two wires – a power and a ground – wired directly to your house battery terminals.
If you’re lucky, the wires will have an inline fuse. (Fuses are now required for all new RVs per NFPA 1192 code, adopted by all RVIA-certified manufacturers.). Common inline fuse sizes are 10A, 15A, and 20A (more on this later).
You’ll either have a wall-mounted plug or a roof-mounted plug. Wall-mounted plugs are usually designed for use with portable solar suitcases; roof-mounted plugs are usually designed for use with permanent solar panels – but that’s just a rule of thumb.
And …. that might be it. There’s no solar charge controller. You’ll have to install that separately or use a solar suitcase.
Option 2: Convenient (not so Cheap)
Now, some solar-prep packages are much more comprehensive. Your factory might include everything but the solar panels! You might have 8-gauge solar power cables run from your battery to a charge controller (already installed!), and then all the way to a roof port!
All you have to do is add the solar panels. Wouldn’t that be nice?!
Truth is, you need to ask your RV manufacturer.
- One manufacturer may choose to include a charge controller on all models out of convenience –
- … Another may only include a charge controller when requested by the dealership.
- One might pre-run all the necessary power wire from roof to controller, and from controller to battery –
- … Another might leave that up to the dealership.
- One might design their solar-prep package to be used with solar suitcases –
- …. While another might plan for you to install your own permanent solar panels.
- One might route their rooftop wire using MC4 connectors hidden under the A/C shroud –
- … And another might use SAE or ATP connectors through a roof entry port.
Head spinning yet?
You don’t have to do the research yourself! Reach out to your dealership and manufacturer, and ask them EXACTLY what the solar package includes and A LIST of what you need to A) install a permanent solar panel system and/or B) to plug in a solar suitcase.
When Would I Use a Solar-Prep Package?
Ever hear of a “solar suitcase” or “solar backpack”? Solar panel manufacturers like Zamp and Renogy offer integrated portable solar systems: solar panels and a charge controller inside a portable case.
You could undo your battery strap and attach some alligator clips to your battery, but who wants to do that every time you set up camp?
Enter: the solar-prep package! It’s a shortcut to your battery. You plug your solar suitcase into your sidewall port, and wallah! – the battery begins charging! No fiddling around with battery box straps or alligator clips.
You CANNOT just plug a solar panel directly into a solar-ready port. You’re feeding current with unregulated voltage to the battery.
Why is that a bad idea, you ask?
Imagine spraying the windows on your house with a spritzing bottle one minute and a fire hose the next. ‘Nuff said. An unregulated, variable power supply will kill a battery in no time flat. That’s the job of a charge controller; to filter and stabilize the outgoing voltage and current compared to the incoming voltage and current. It’s like an electrical traffic controller.
You’re very likely to damage or ruin that new $150 AGM battery. It might even explode. It’s rare, but yes, it does happen.
Can I Add Parts to an RV Solar-Ready Package?
Bad news, reader: If you want to install panels on your rig, a solar-prep package might be as useless as a glass hammer.
If you have a sidewall-mounted “solar prep” power inlet, then oftentimes, it’s easier to route your own wires from a solar charge controller to the battery, bypassing the solar-prep port plug completely.
Psst … If you’re planning on routing your own cables, especially if you’re installing multiple panels, you need to check out this solar cable installation video from my fellow RV blogger extraordinaire, RV With Tito.
IF the port is a roof-mounted waterproof cable inlet and IF the wires are accessible, you might be able to tap in downstream and connect a charge controller inline. Those are both big IFs, unfortunately.
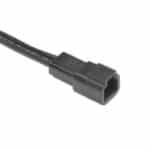
Plus, not all plugs are big enough for permanently mounted solar panels. One popular solar plug made by Furrion is only rated for 10A. That’s big enough for a 100-150W system – no bigger. That’s enough for just one solar panel.
There’s no enforced standard for wire size. Good manufacturers use 8GA (or at least 10GA) wire for up to 30A current and minimum voltage drop. Lazy ones use 14GA wire, limited to 15A. If you’re building your own, you should use the largest wire size your system will accept. Usually, that’s 10GA. Some can go up to 8GA. Beyond 8GA, you’re usually looking at a custom solar system installation, which is beyond the scope of this article. As I said … ask your manufacturer or dealer!
Do I Need an Adapter to Use My Solar-Prep Package?
ATP
SAE
Furrion
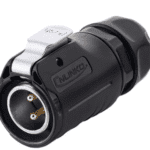
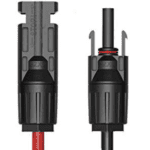
MC4
If your sidewall sticker says anything about “Only Use X Company’s Exclusive Panels With This Port!,” you can probably ignore it. That’s what they call “forced compliance.”
You can almost always use an adapter to plug in the solar power product of your choice. Almost all of the typical solar power inlets are rated for the same voltage ranges.
There are three popular plug styles:
- SAE: Probably the most popular aftermarket connection, the SAE plug is a simple polarized 2-pin connection.
- Furrion: A common OEM solar-prep plug, the Furrion plug is a round 2-pin connector design that locks together for a positive connection.
- MC4: A male-female connector normally used in wire-to-wire connections.
- ATP: Used on Obsidian-series Zamp solar panel products
Honestly, they all work. The big difference is amperage. The Furrion plug is only rated for 10A. If you’re running multiple batteries and multiple solar panels, you’ll need more juice.
You can purchase an aftermarket adapter for any one of them.
*One last word of caution!*
No electricity is truly safe! Even though solar panels only carry 10-20 volts, you can still get shocked and seriously hurt or killed with a shorted connection.
If your RV already comes with a solar-prep package, great. Consider it a bonus. If not, back to alligator clips!
Leave a Reply